Difference between revisions of "Getting Started"
m (renamed box -> enclosure) |
Martin Cupak (talk | contribs) m (Add ling to checklist PDFs) |
||
| (19 intermediate revisions by 2 users not shown) | |||
| Line 4: | Line 4: | ||
= Lens and DSLR installation = | = Lens and DSLR installation = | ||
| − | In order to prevent the issues with lenses being damaged and/or de-focussed in transport, the DSLR body and Samyang lens are shipped separately to the main box. That completely eliminates the mechanical stress transferred from the packaging to the DSLR/lens joint. On the other hand, that means the user will need to install them in the box upon arrival. | + | In order to prevent the issues with lenses being damaged and/or de-focussed in transport, the DSLR body and Samyang lens are since August 2018 shipped separately to the main box. That completely eliminates the mechanical stress transferred from the packaging to the DSLR/lens joint. On the other hand, that means the user will need to install them in the [[Observatory_Types|DFNEXT]] box upon arrival. |
Please follow [[How to install flanged Samyang lens and DSLR to the DFNEXT enclosure|these]] instructions: [[How to install flanged Samyang lens and DSLR to the DFNEXT enclosure]] | Please follow [[How to install flanged Samyang lens and DSLR to the DFNEXT enclosure|these]] instructions: [[How to install flanged Samyang lens and DSLR to the DFNEXT enclosure]] | ||
| + | |||
| + | = Connecting Fireball Observatory to the Internet = | ||
| + | |||
| + | DFN observatoties take images during night, store them on HDDs and run event detection during day. In order to triangulate the luminous trajectory and to be able to do further exciting calculations like backtrace the trajectory to find out where the meteoroid came from, whether it dropped meteorite and where it may be found, the event detection data must be transferred to server. For this and other operational reasons, it is highy desirable for the observatories to be connected to the Internet. | ||
| + | |||
| + | [[File:DFNSMALL Advantech PC eth ports marked.jpg|thumb|Ethernet interfaces of DFNSMALL with Advantech PC |480x360px]] [[File:DFNSMALL Commell PC eth ports marked.jpg|thumb|Ethernet interfaces of DFNSMALL or DFNKIT with Commell LE-37D PC |480x360px]] | ||
| + | |||
| + | == Ethernet port eth0 == | ||
| + | |||
| + | For network/internet connection, it is important to use the correct port. In the default configuration as the DFN observatory box arrive from us, the upper port eth1 (DFNEXT/DFNSMALL box oriented lenses up) is for local connection with laptop during testing or on site, on this port DHCP server is running and camera system assigns IP address to whatever is connected to it. It is not good idea to connect this port to local network eg in office or lab, because it may cause problems with other computers and devices in the local network. | ||
| + | The lower port (eth0) is awaiting IP address to be assigned by DHCP server and this socket is the one to connect camera to the Internet. | ||
| + | |||
| + | DFNEXT cameras come with stickers inside the door marking the ports, for DFNSMALL cameras please refer to images. | ||
| + | |||
| + | The configuration of ethernet port eth0 can be modified in file /etc/network/interfaces, for example in case there is no DHCP server available in the local network and static IP and gateway needs to be set up. Please refer to Debian documentation [http://https://wiki.debian.org/NetworkConfiguration] or contact us for help. | ||
= Connecting to Your Fireball Observatory for the First Time = | = Connecting to Your Fireball Observatory for the First Time = | ||
| − | [[File:DFN camera network interfaces.svg|thumb| | + | [[File:DFN camera network interfaces.svg|thumb|DFNEXT camera network interfaces|600x600px]] |
You will probably want to set your fireball camera up in your lab or office before you install it. This will allow you to try logging in, configuring the camera and running a test in a comfortable environment. | You will probably want to set your fireball camera up in your lab or office before you install it. This will allow you to try logging in, configuring the camera and running a test in a comfortable environment. | ||
| Line 43: | Line 58: | ||
In order to check that the camera survived the transport and before deploying, we recommend to do a few basic configurations, then you can run a couple of tests (see [[Configuring the Software]]) | In order to check that the camera survived the transport and before deploying, we recommend to do a few basic configurations, then you can run a couple of tests (see [[Configuring the Software]]) | ||
= Selecting an Appropriate Site for Deployment = | = Selecting an Appropriate Site for Deployment = | ||
| − | [[File:Bad Quality Image.jpg|thumb|An example of bad light pollution. |600x600px]][[File: | + | [[File:Bad Quality Image.jpg|thumb|An example of bad light pollution in metropolitan area. |600x600px]][[File:Perfect_calibration_image_Gabyon.jpg|thumb|An example of low light pollution and a good horizon.|600x600px]] |
Easy is better than hard, you are not scouting for a site to put the next 10 metre class telescope! However those simple principles help ensure maximum science returns from the cameras: | Easy is better than hard, you are not scouting for a site to put the next 10 metre class telescope! However those simple principles help ensure maximum science returns from the cameras: | ||
| Line 50: | Line 65: | ||
*'''Minimise Ocean Coverage''': The primary goal of the DFN is to recover meteorites with orbits. This is much harder to accomplish if the meteorite lands in the water. So to make the best use of our camera's coverage, we advise placing the camera unit at least 50km away from the coastline if possible. | *'''Minimise Ocean Coverage''': The primary goal of the DFN is to recover meteorites with orbits. This is much harder to accomplish if the meteorite lands in the water. So to make the best use of our camera's coverage, we advise placing the camera unit at least 50km away from the coastline if possible. | ||
*'''Reasonably Accessible''': Occasionally these camera units need maintenance and servicing to ensure they are fully operational, such as changing the hard-drives and cleaning the lenses. Therefore, we would advise locating it within easy car access. This can include farmland (with owners permission of course) or off-road to avoid interference from car headlights and potential vandalism. | *'''Reasonably Accessible''': Occasionally these camera units need maintenance and servicing to ensure they are fully operational, such as changing the hard-drives and cleaning the lenses. Therefore, we would advise locating it within easy car access. This can include farmland (with owners permission of course) or off-road to avoid interference from car headlights and potential vandalism. | ||
| − | *'''Internet connection''': the camera boxes come with '''ethernet''' ports and '''WiFi''', they don't require a fast internet connection. When land internet is not available or too complicated to organise, the '''3G/4G''' modem can be used with a SIM card, check the coverage of local GSM providers. In Australia see the [https://www.telstra.com.au/coverage-networks/our-coverage Telstra coverage map] or the [http://www.optus.com.au/shop/mobile/network/coverage Optus coverage map]. The GPS/3G external antenna that comes with the camera is usually enough to get a good signal in the light orange areas on the Telstra map ("3G external antenna"), a larger antenna can extend the coverage even further. | + | *'''Internet connection''': the camera boxes come with '''ethernet''' ports and '''WiFi''', they don't require a fast internet connection. When land internet is not available or too complicated to organise, the '''3G/4G''' mobile network modem can be used with a SIM card, check the coverage of local GSM providers. In Australia see the [https://www.telstra.com.au/coverage-networks/our-coverage Telstra coverage map] or the [http://www.optus.com.au/shop/mobile/network/coverage Optus coverage map]. The GPS/3G external antenna that comes with the camera is usually enough to get a good signal in the light orange areas on the Telstra map ("3G external antenna"), a larger antenna can extend the coverage even further. |
*'''Horizon Views''': Ideally, a location with uninterrupted view of the whole horizon is preferred. This means avoiding areas in valleys, near man-made structures, or with an abundance of trees. | *'''Horizon Views''': Ideally, a location with uninterrupted view of the whole horizon is preferred. This means avoiding areas in valleys, near man-made structures, or with an abundance of trees. | ||
| − | *'''Roof versus ground setup''': a [[Rooftop Fireball Camera Installation|roof setup]] seems easy and convenient, but can actually take more time to set up than a [[Standalone Fireball Camera Installation|ground setup]] and sometime be an issue regarding health and safety. | + | *'''Roof versus ground setup''': a [[Rooftop Fireball Camera Installation|roof setup]] seems easy and convenient, but can actually take more time to set up than a [[Standalone Fireball Camera Installation|ground setup]] and sometime be an issue regarding health and safety (working on the roof) and reliability of mains power at some sites. |
= Deploying Your Fireball Observatory = | = Deploying Your Fireball Observatory = | ||
==== Physical Installation ==== | ==== Physical Installation ==== | ||
| − | Fireball observatories need to be securely mounted; movement will degrade data quality. They also require reliable power and internet connections. | + | Fireball observatories need to be securely mounted; movement will degrade data quality. They also require reliable power and internet connections. This is recommended [[Camera_Maintenance_Toolkit|minimal toolkit]]. This is a [[Camera_servicing_kit|comprehensive servicing]] kit we use on field trips in Australia. |
| − | [[Rooftop Fireball Camera Installation]] | + | [[Camera_Maintenance#Servicing_and_deployment_checklists|Servicing and deployment checklists]] - printable PDF sheets to go through on the remote site |
| + | |||
| + | [[Rooftop Fireball Camera Installation]] (valid for DFNSMALL and DFNEXT) | ||
[[Standalone Fireball Camera Installation]] | [[Standalone Fireball Camera Installation]] | ||
| − | [[Rooftop Kit Camera Installation]] (if your fireball camera has a clear top and only one lens) | + | [[Rooftop Kit Camera Installation]] (if your fireball camera has a clear top and only one lens - DFNKIT) |
| + | |||
| + | Make your own DFNEXT/DFNSMALL DC power cable using these instructions [[File:DFNEXT_DC_Power_Cable_Assembly.pdf]]. Useful for solar powered (~12V) sites or in case when custom/specific AC/DC power supply is used. | ||
==== Software Configuration ==== | ==== Software Configuration ==== | ||
| Line 70: | Line 89: | ||
[[Creating a Mask]] to remove non-sky regions of the image | [[Creating a Mask]] to remove non-sky regions of the image | ||
| + | |||
| + | ==== Internet access ==== | ||
| + | [[Finding network interface MAC address]] | ||
| + | |||
| + | [[Mobile network - 3G, 4G]] | ||
| + | |||
| + | [[WiFi configuration]] | ||
| + | |||
= Checking Images = | = Checking Images = | ||
Point to downloading images... | Point to downloading images... | ||
Latest revision as of 06:03, 10 May 2022
The DFN observatories use a GNU/Linux operating system (Debian) and can be fully controlled through the Linux terminal either locally or remotely from anywhere in the world. Much of the observatories' functionality is also accessible through a graphical web interface which can also be used locally or remotely.
There is more than one type of DFN observatory; you can figure out what type you have here. Most of the instructions on this wiki will focus primarily on the latest DFNEXT observatories as more of these have been delivered to collaborators than the other types and this is the only fireball observatory design still in production.
Contents
Lens and DSLR installation
In order to prevent the issues with lenses being damaged and/or de-focussed in transport, the DSLR body and Samyang lens are since August 2018 shipped separately to the main box. That completely eliminates the mechanical stress transferred from the packaging to the DSLR/lens joint. On the other hand, that means the user will need to install them in the DFNEXT box upon arrival.
Please follow these instructions: How to install flanged Samyang lens and DSLR to the DFNEXT enclosure
Connecting Fireball Observatory to the Internet
DFN observatoties take images during night, store them on HDDs and run event detection during day. In order to triangulate the luminous trajectory and to be able to do further exciting calculations like backtrace the trajectory to find out where the meteoroid came from, whether it dropped meteorite and where it may be found, the event detection data must be transferred to server. For this and other operational reasons, it is highy desirable for the observatories to be connected to the Internet.
Ethernet port eth0
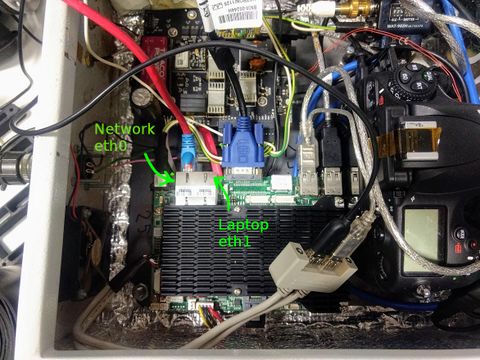
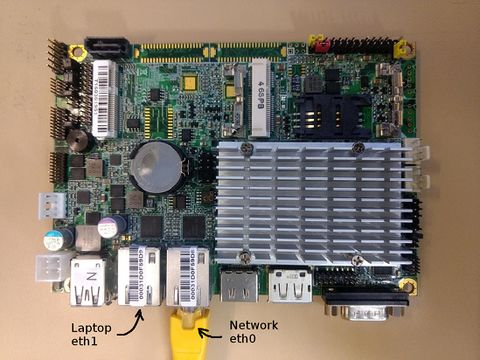
For network/internet connection, it is important to use the correct port. In the default configuration as the DFN observatory box arrive from us, the upper port eth1 (DFNEXT/DFNSMALL box oriented lenses up) is for local connection with laptop during testing or on site, on this port DHCP server is running and camera system assigns IP address to whatever is connected to it. It is not good idea to connect this port to local network eg in office or lab, because it may cause problems with other computers and devices in the local network. The lower port (eth0) is awaiting IP address to be assigned by DHCP server and this socket is the one to connect camera to the Internet.
DFNEXT cameras come with stickers inside the door marking the ports, for DFNSMALL cameras please refer to images.
The configuration of ethernet port eth0 can be modified in file /etc/network/interfaces, for example in case there is no DHCP server available in the local network and static IP and gateway needs to be set up. Please refer to Debian documentation [1] or contact us for help.
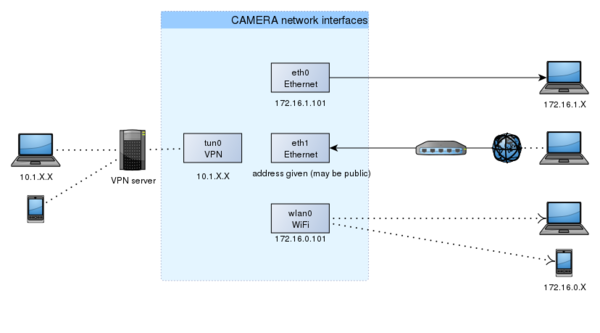
Connecting to Your Fireball Observatory for the First Time
You will probably want to set your fireball camera up in your lab or office before you install it. This will allow you to try logging in, configuring the camera and running a test in a comfortable environment.
There are three ways to connect to the observatory depending on your situation. These are:
- locally via the network (ethernet or WiFi) (recommended initially)
- locally using a HDMI or VGA monitor and USB keyboard
- remotely over the VPN
You have the choice of either using the terminal or the graphical web interface for all three of the above connection scenarios. (Although logging in locally using a monitor and keyboard is not recommended if you want to use the web interface.)
Two Options for Controlling Your Observatory: the Terminal and the Web Interface
The Linux terminal is a powerful text based interface that can be used to control the fireball observatories or any other Linux computer. Other operating systems including BSD, Mac OS X, Windows, Android and iOS can also be controlled from a terminal; however, levels of support vary.
If you are only familiar with graphical user interfaces such as the Windows Shell or Mac OS X Aqua it may initially be hard to see the appeal of the terminal, as the command line is a fundamentally different way of interacting with your computer. However, some of the advantages are that:
- commands can be executed on remote computers as easily as on your local computer (even over poor connections),
- the interface is a very fast way of getting things done once you know what you're doing,
- multiple commands can be used together to do quite fancy things and
- it is easier and less time consuming to create command line interface (CLI) programs than it is to create graphical user interface (GUI) programs.
DFN observatories can be fully controlled through the terminal; however, most functionality (including all common operations) is also now available through the graphical web interface. This interface is useful for users who prefer graphical interfaces, users on mobile devices and for quickly accomplishing small tasks such as turning the drives on and off.
TODO: finish tidying up this page
There are a few things you might want to set up on your local machine to make your life easier:
- Setting up an SSH key for the terminal connection
- Editing your hosts file
We currently have three different fireball observatory designs; see Which camera do I have?
In order to check that the camera survived the transport and before deploying, we recommend to do a few basic configurations, then you can run a couple of tests (see Configuring the Software)
Selecting an Appropriate Site for Deployment
Easy is better than hard, you are not scouting for a site to put the next 10 metre class telescope! However those simple principles help ensure maximum science returns from the cameras:
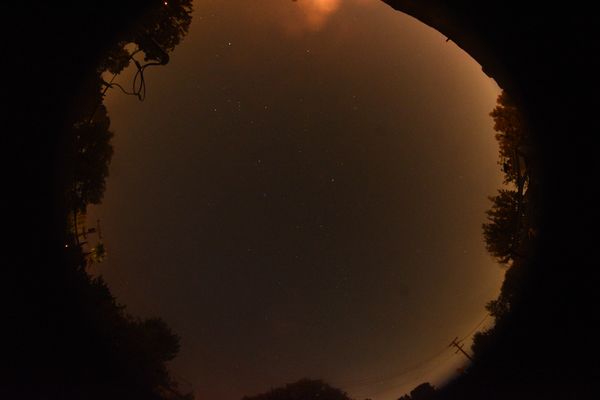
- Light Pollution: The amount of light pollution in an area generally depends on its vicinity to towns or cities, and can affect the quality of the night sky images substantially. We recommend taking a look at http://darksitefinder.com/maps/world.html to assess your proposed area for its level of light pollution. No worse than green as a rule of thumb, but the darker the better.
- Camera Spacing: If you are installing more than one camera or have existing cameras installed in your area, then you will need to space these units between 80km and 150km apart to optimise both network coverage and triangulability. Spacing in outback Australia is typically 100-150 km, for more light polluted areas 80-100 km is best.
- Minimise Ocean Coverage: The primary goal of the DFN is to recover meteorites with orbits. This is much harder to accomplish if the meteorite lands in the water. So to make the best use of our camera's coverage, we advise placing the camera unit at least 50km away from the coastline if possible.
- Reasonably Accessible: Occasionally these camera units need maintenance and servicing to ensure they are fully operational, such as changing the hard-drives and cleaning the lenses. Therefore, we would advise locating it within easy car access. This can include farmland (with owners permission of course) or off-road to avoid interference from car headlights and potential vandalism.
- Internet connection: the camera boxes come with ethernet ports and WiFi, they don't require a fast internet connection. When land internet is not available or too complicated to organise, the 3G/4G mobile network modem can be used with a SIM card, check the coverage of local GSM providers. In Australia see the Telstra coverage map or the Optus coverage map. The GPS/3G external antenna that comes with the camera is usually enough to get a good signal in the light orange areas on the Telstra map ("3G external antenna"), a larger antenna can extend the coverage even further.
- Horizon Views: Ideally, a location with uninterrupted view of the whole horizon is preferred. This means avoiding areas in valleys, near man-made structures, or with an abundance of trees.
- Roof versus ground setup: a roof setup seems easy and convenient, but can actually take more time to set up than a ground setup and sometime be an issue regarding health and safety (working on the roof) and reliability of mains power at some sites.
Deploying Your Fireball Observatory
Physical Installation
Fireball observatories need to be securely mounted; movement will degrade data quality. They also require reliable power and internet connections. This is recommended minimal toolkit. This is a comprehensive servicing kit we use on field trips in Australia.
Servicing and deployment checklists - printable PDF sheets to go through on the remote site
Rooftop Fireball Camera Installation (valid for DFNSMALL and DFNEXT)
Standalone Fireball Camera Installation
Rooftop Kit Camera Installation (if your fireball camera has a clear top and only one lens - DFNKIT)
Make your own DFNEXT/DFNSMALL DC power cable using these instructions File:DFNEXT DC Power Cable Assembly.pdf. Useful for solar powered (~12V) sites or in case when custom/specific AC/DC power supply is used.
Software Configuration
Calibrating the camera orientation
Creating a Mask to remove non-sky regions of the image
Internet access
Finding network interface MAC address
Checking Images
Point to downloading images...
