Difference between pages "File:BillaKalina camera 1200.JPG" and "Standalone Fireball Camera Installation"
Martin Cupak (talk | contribs) m |
Robert Howie (talk | contribs) (→Battery Box) (Tag: visualeditor) |
||
| Line 1: | Line 1: | ||
| − | + | <gallery mode="packed" heights="350"> | |
| + | File:DaysHill_camera_1200.JPG| | ||
| + | File:Weekeroo.jpg| | ||
| + | File:Nilpena_camera_1200.JPG| | ||
| + | File:Moolawatana_camera_1200.JPG| | ||
| + | File:Sm_DSC_2024.JPG| | ||
| + | File:Ingomar_camera_1200.JPG| | ||
| + | File:BillaKalina_camera_1200.JPG| | ||
| + | </gallery> | ||
| + | |||
| + | == Observatory Stand Assembly == | ||
| + | At least two people are recommended for assembling the stand. | ||
| + | |||
| + | # Place stand base on four blocks or bricks ensuring there is clearance for the rib and back's tabs. | ||
| + | # Place stand back on top of base and insert tabs. | ||
| + | # Lean stand back outwards and insert stand rib. You may have to wiggle the pieces until they fall into place. | ||
| + | # Start inserting wedges staring from the corners. Do the top first and then start on the bottom corners. It may be helpful to tilt the stand over a bit or lay it down on its side. | ||
| + | # Once the wedges are are all securely inserted, wire up the four fencing wire cross stays and tension by twisting using a large screwdriver. | ||
| + | # Align stand so stand back is facing south (in the Southern Hemisphere, north in the Northern Hemisphere). | ||
| + | # Stake down the stand in soft soil or weigh down the stand using rocks or sandbags. As the centre of mass is not over the centre in the base, it is not safe to leave the stand without weight or stakes. | ||
| + | |||
| + | = Solar Panel Stand Assembly = | ||
| + | |||
| + | # Assemble solar panel stand using aluminium angle bar, wedges, panels and self tapping fasteners (Tek Screws). | ||
| + | # Add sand shoes in soft soil | ||
| + | # Stake or weigh down solar panel stand. | ||
| + | |||
| + | = Power System = | ||
| + | Components: | ||
| + | |||
| + | * Enclosure | ||
| + | |||
| + | * Deep cycle battery | ||
| + | * Solar charge controller | ||
| + | * Fuses and fuseholders for load and battery if not provided by solar charge controller | ||
| + | * Cable glands or panel mount connectors for solar panel wiring | ||
| + | * DFN observatory power connector | ||
| + | * Wire for connections | ||
| + | |||
| + | === Enclosure === | ||
| + | The B&R Forte FR060430 has been used for all previous solar powered DFN observatory installations (unless there is an existing power supply). It is available from electrical wholesalers (e.g. [http://advanced.net.au/ Advanced Electrical Equipment], [http://electricaldistributors.com.au/ Electrical Distributors], [https://www.mmem.com.au/ MM Electrical Merchandising]) or at a higher price from [https://au.rs-online.com/web/p/wall-boxes/8852711 RS Components]. | ||
| + | |||
| + | === Deep Cycle Battery === | ||
| + | The recommended battery for the DFN fireball observatories is a 165-180 AH deep cycle lead acid battery. This is the same sort of battery you would use to run a fridge in an RV or boat. AGM (absorbant glass mat) or gel constructions are fine. The DFN uses 165 or 175 AH AGM deep cycle batteries. Ensure that the battery will fit inside the Forte FR060430 (usable internal dimensions a bit less than 600x400x300 mm) with the solar charge controller. | ||
| + | |||
| + | Good suppliers include: | ||
| + | |||
| + | * [http://www.independantbattery.com.au/ Independent Battery Distributors], | ||
| + | * [https://www.batteryworld.com.au/ Battery World], and | ||
| + | * [https://www.aussiebatteries.com.au/ Aussie Batteries & Solar]. | ||
| + | |||
| + | It is worth ordering in bulk and obtaining multiple quotes to secure a good price. Lead acid batteries will degrade if not kept charged, so it is worth charging any batteries you have in storage about every six months. | ||
| + | |||
| + | When used in a solar power application it is best to keep the [[wikipedia:Depth_of_discharge|depth of discharge]] to 30% or less to prolong the cycle life of the battery. | ||
| + | |||
| + | === Solar Charge Controller === | ||
| + | A [[wikipedia:Maximum_power_point_tracking|maximum power point tracking]] charge controller will allow you to use much better value 200-360W 60 cell solar panels designed for rooftop use and available as low as $0.50 per Watt instead of 65-150W solar panels designed for camping which are much more expensive (around $2 per Watt). | ||
| + | |||
| + | The [https://www.victronenergy.com/solar-charge-controllers/mppt7510 Victron Energy BlueSolar MPPT 75/15] would be a good option that seems like [https://www.outbackmarine.com.au/blue-solar-mppt-75-15-charge-controller-victron-sc good value]. | ||
| + | |||
| + | Amphenol MS3102A 14S-2P | ||
| + | |||
| + | * | ||
| + | |||
| + | == Setting up: == | ||
| + | |||
| + | [[DFNEXT Assembly]] | ||
| + | |||
| + | === orientation === | ||
| + | On the Southern hemisphere, the solar panels shall face North, while the observatory box doors shall face south. On the Northern hemisphere it is obviously the other way around. | ||
| + | |||
| + | <pic of whic way should be north> | ||
| + | |||
| + | === heat shield === | ||
| + | north or south hemisphere | ||
| + | |||
| + | === gps === | ||
| + | cables and connections | ||
| + | |||
| + | === wifi, 3G, ethernet === | ||
| + | blah | ||
| + | |||
| + | == Example DFN design == | ||
| + | System as used by DFN below. you can do other designs, the important criteria for a power system is it must provide <XX> Amp-hours per day, reliably: | ||
| + | |||
| + | === stand assembly === | ||
| + | <pic> | ||
| + | |||
| + | === panels === | ||
| + | <pic> | ||
| + | |||
| + | === battery box and cabling === | ||
| + | <pic> | ||
| + | |||
| + | __NOTOC__ | ||
Revision as of 13:10, 3 October 2018


Observatory Stand Assembly
At least two people are recommended for assembling the stand.
- Place stand base on four blocks or bricks ensuring there is clearance for the rib and back's tabs.
- Place stand back on top of base and insert tabs.
- Lean stand back outwards and insert stand rib. You may have to wiggle the pieces until they fall into place.
- Start inserting wedges staring from the corners. Do the top first and then start on the bottom corners. It may be helpful to tilt the stand over a bit or lay it down on its side.
- Once the wedges are are all securely inserted, wire up the four fencing wire cross stays and tension by twisting using a large screwdriver.
- Align stand so stand back is facing south (in the Southern Hemisphere, north in the Northern Hemisphere).
- Stake down the stand in soft soil or weigh down the stand using rocks or sandbags. As the centre of mass is not over the centre in the base, it is not safe to leave the stand without weight or stakes.
Solar Panel Stand Assembly
- Assemble solar panel stand using aluminium angle bar, wedges, panels and self tapping fasteners (Tek Screws).
- Add sand shoes in soft soil
- Stake or weigh down solar panel stand.
Power System
Components:
- Enclosure
- Deep cycle battery
- Solar charge controller
- Fuses and fuseholders for load and battery if not provided by solar charge controller
- Cable glands or panel mount connectors for solar panel wiring
- DFN observatory power connector
- Wire for connections
Enclosure
The B&R Forte FR060430 has been used for all previous solar powered DFN observatory installations (unless there is an existing power supply). It is available from electrical wholesalers (e.g. Advanced Electrical Equipment, Electrical Distributors, MM Electrical Merchandising) or at a higher price from RS Components.
Deep Cycle Battery
The recommended battery for the DFN fireball observatories is a 165-180 AH deep cycle lead acid battery. This is the same sort of battery you would use to run a fridge in an RV or boat. AGM (absorbant glass mat) or gel constructions are fine. The DFN uses 165 or 175 AH AGM deep cycle batteries. Ensure that the battery will fit inside the Forte FR060430 (usable internal dimensions a bit less than 600x400x300 mm) with the solar charge controller.
Good suppliers include:
It is worth ordering in bulk and obtaining multiple quotes to secure a good price. Lead acid batteries will degrade if not kept charged, so it is worth charging any batteries you have in storage about every six months.
When used in a solar power application it is best to keep the depth of discharge to 30% or less to prolong the cycle life of the battery.
Solar Charge Controller
A maximum power point tracking charge controller will allow you to use much better value 200-360W 60 cell solar panels designed for rooftop use and available as low as $0.50 per Watt instead of 65-150W solar panels designed for camping which are much more expensive (around $2 per Watt).
The Victron Energy BlueSolar MPPT 75/15 would be a good option that seems like good value.
Amphenol MS3102A 14S-2P
Setting up:
orientation
On the Southern hemisphere, the solar panels shall face North, while the observatory box doors shall face south. On the Northern hemisphere it is obviously the other way around.
<pic of whic way should be north>
heat shield
north or south hemisphere
gps
cables and connections
wifi, 3G, ethernet
blah
Example DFN design
System as used by DFN below. you can do other designs, the important criteria for a power system is it must provide <XX> Amp-hours per day, reliably:
stand assembly
<pic>
panels
<pic>
battery box and cabling
<pic>
File history
Click on a date/time to view the file as it appeared at that time.
| Date/Time | Thumbnail | Dimensions | User | Comment | |
|---|---|---|---|---|---|
| current | 23:50, 14 September 2018 | 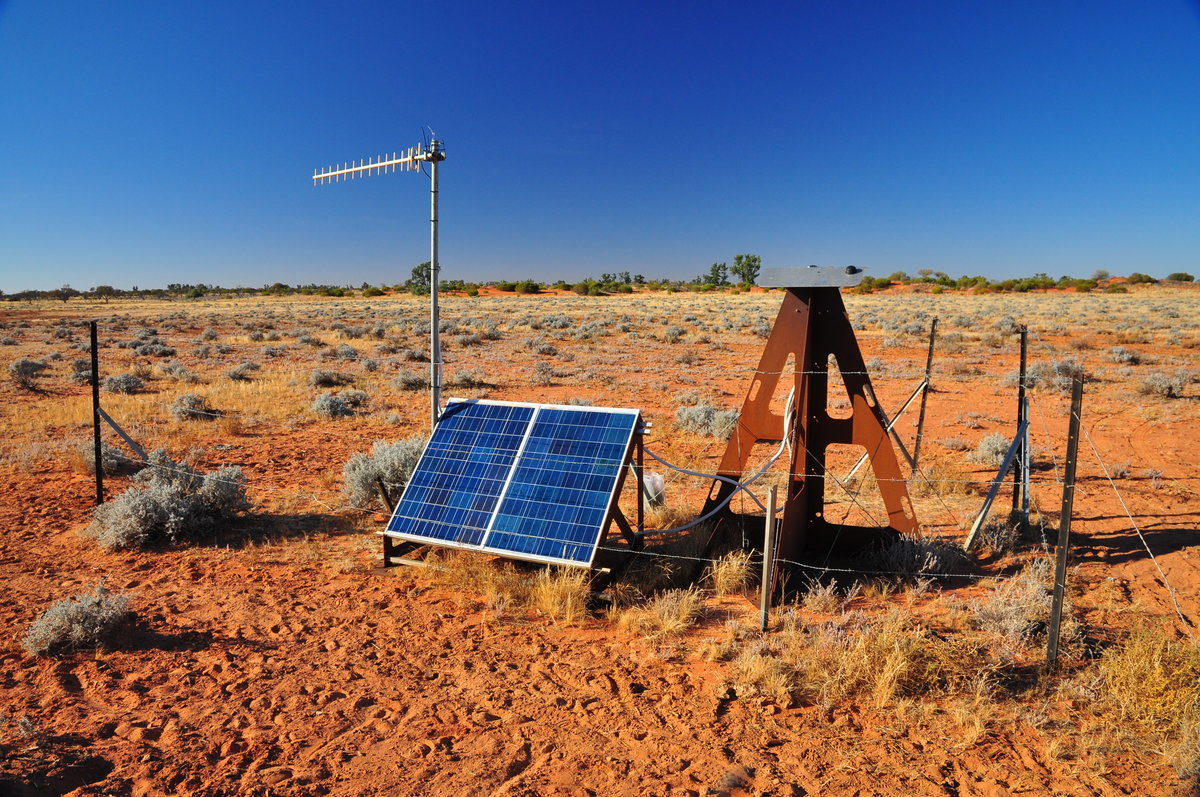 | 1,200 × 797 (392 KB) | Martin Cupak (talk | contribs) | Billa Kalina: solar powered DFN observatory, 2 solar panels, cattle proof barbed wire fence, mobile signal reception quite low, no signal with hand held device, therefore directional Yaggi antenna used |
- You cannot overwrite this file.
File usage
The following 2 pages link to this file: