Difference between revisions of "DFNEXT temporary station"
(Created page with " Things needed: * DFNEXT * DSLR * Lens * WiFi antenna * Modem + SIM * GPS+GSM antenna * higher gain GSM antenna, if required * battery * power cable: ring terminals -> Ampheno...") |
(→using L-bracket weighted down by battery) |
||
| (6 intermediate revisions by the same user not shown) | |||
| Line 7: | Line 7: | ||
* Modem + SIM | * Modem + SIM | ||
* GPS+GSM antenna | * GPS+GSM antenna | ||
| + | * 1 hard drive (6TB): do not put more than 1 as this will drain the battery faster | ||
* higher gain GSM antenna, if required | * higher gain GSM antenna, if required | ||
* battery | * battery | ||
* power cable: ring terminals -> Amphenol | * power cable: ring terminals -> Amphenol | ||
| − | * camera stand | + | * camera stand (2 types, see below) |
| Line 21: | Line 22: | ||
= Special forced video recording = | = Special forced video recording = | ||
| − | |||
| − | |||
| + | * [[Freeture_forced_frame_save|Forced Freeture recording]] | ||
| + | |||
| + | = Tips = | ||
| + | * Follow [[Camera_Maintenance|instructions]] for setup. | ||
| + | * Important: do not move or touch the stand or camera box once the night has started: Astrometric calibration images for both video and still are going to be recorded in the early part of the night when the moon is not up. | ||
| + | * Close the box and use WiFi or VPN to check on the camera instead of LAN cable once setup. | ||
| + | |||
| + | |||
| + | = Camera stand options = | ||
| + | |||
| + | == using L-bracket weighted down by battery == | ||
| + | |||
| + | A short ring-terminals -> Amphenol cable can be used for this setup (save long cables for other setups). | ||
| + | |||
| + | [[File:L_bracket_temporary_stand_assembly.jpg|400px]] | ||
| + | |||
| + | [[File:L_bracket_temporary_stand.jpg|400px]] | ||
| + | |||
| + | == using Fireball imaging stand == | ||
| + | |||
| + | * Place battery and shovel gravel/rocks on the foot of the stand. | ||
| + | * Use ratchet straps to tension the stand (or fencing wire, the usual method). | ||
| + | |||
| + | [[File:DSD_2872_1200_Gabyon_camera_from_back.jpg|400px]] | ||
| + | |||
| + | == using FireOpal imaging stand == | ||
| + | |||
| + | Place battery and shovel gravel/rocks on the foot of the stand. | ||
| − | + | need picture... | |
| − | |||
| − | |||
Latest revision as of 12:51, 12 November 2020
Things needed:
- DFNEXT
- DSLR
- Lens
- WiFi antenna
- Modem + SIM
- GPS+GSM antenna
- 1 hard drive (6TB): do not put more than 1 as this will drain the battery faster
- higher gain GSM antenna, if required
- battery
- power cable: ring terminals -> Amphenol
- camera stand (2 types, see below)
Contents
Special staggered still triggering mode
- Martin T's script, parameters...
- crontab modification
Special forced video recording
Tips
- Follow instructions for setup.
- Important: do not move or touch the stand or camera box once the night has started: Astrometric calibration images for both video and still are going to be recorded in the early part of the night when the moon is not up.
- Close the box and use WiFi or VPN to check on the camera instead of LAN cable once setup.
Camera stand options
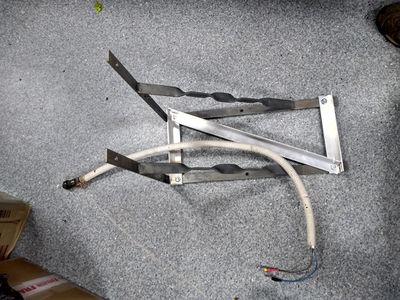
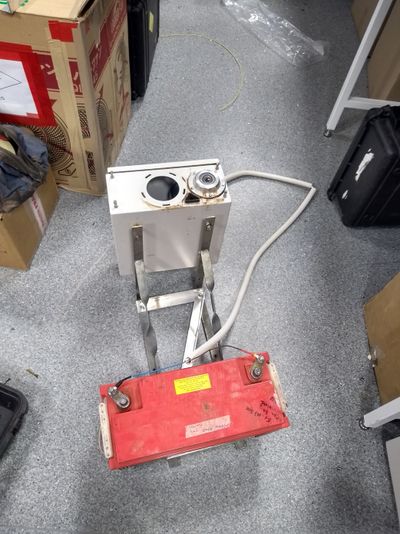
using L-bracket weighted down by battery
A short ring-terminals -> Amphenol cable can be used for this setup (save long cables for other setups).
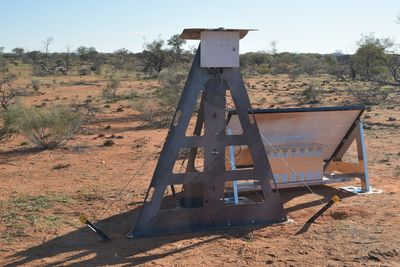
using Fireball imaging stand
- Place battery and shovel gravel/rocks on the foot of the stand.
- Use ratchet straps to tension the stand (or fencing wire, the usual method).
using FireOpal imaging stand
Place battery and shovel gravel/rocks on the foot of the stand.
need picture...


