Difference between revisions of "Focusing the DSLR"
Robert Howie (talk | contribs) (Tag: visualeditor) |
Robert Howie (talk | contribs) (Tag: visualeditor) |
||
| Line 6: | Line 6: | ||
* A monitor with a HDMI input. We use and recommend the battery powered [https://www.bhphotovideo.com/c/product/1359220-REG/lilliput_a7s_full_hd_7.html Lilliput A7S] ([https://www.bhphotovideo.com/c/product/836000-REG/watson_b_4206_np_f975_battery_pack_f_sony.html/pageID/accessory battery]). | * A monitor with a HDMI input. We use and recommend the battery powered [https://www.bhphotovideo.com/c/product/1359220-REG/lilliput_a7s_full_hd_7.html Lilliput A7S] ([https://www.bhphotovideo.com/c/product/836000-REG/watson_b_4206_np_f975_battery_pack_f_sony.html/pageID/accessory battery]). | ||
| − | * A HDMI Mini to HDMI cable (see [https://en.wikipedia.org/wiki/File:HDMI_Connector_Types.png] for HDMI connector types) | + | * A HDMI Mini to HDMI cable (see [https://en.wikipedia.org/wiki/File:HDMI_Connector_Types.png] for HDMI connector types). You will probably need a cable with an angled mini HDMI cable. ([https://www.bhphotovideo.com/c/search?ci=8103&fct=fct_a_features_3035%7cangled-connectors%2bfct_hdmi-cable-type_923%7cmini-hdmi-to-hdmi&N=4288594203& You can find some here], but be sure to check that it is the mini end that is angled—if not both). |
* A power source for the observatory and monitor. | * A power source for the observatory and monitor. | ||
* Visible stars. | * Visible stars. | ||
Latest revision as of 17:58, 31 October 2018
There are many methods for focusing the DSLR. You need to be able to capture and review an image (in a suitably dark location to observe stars) and adjust the focus ring. This guide will describe a method for focusing the DSLR when it is installed in the observatory.
You will need:
- A monitor with a HDMI input. We use and recommend the battery powered Lilliput A7S (battery).
- A HDMI Mini to HDMI cable (see [1] for HDMI connector types). You will probably need a cable with an angled mini HDMI cable. (You can find some here, but be sure to check that it is the mini end that is angled—if not both).
- A power source for the observatory and monitor.
- Visible stars.
- A method for logging into your camera.
You should walk through these steps in a laboratory setting first when possible, however the best location for the focus will be the intended installation site.
- Attach the Nikon DSLR to the monitor using the HDMI Mini to HDMI cable.
- Power the camera using the command
python /opt/dfn-software/enable_camera.pyor Camera > Enable Camera on the GUI. - Remove the tape around the focus ring.
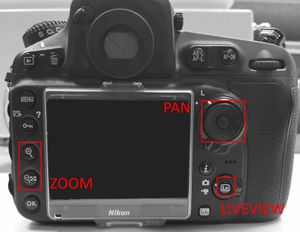
- Press the liveview [Lv] button on the back of the DSLR to enable output to the monitor.
- Find a star close to the top or bottom edge and zoom in using the Nikon controls.
- Carefully adjust the focus ring until the star is as small and round as possible. Turning the ring back and forth across that position will ensure the best position is identified.
- Ensure the aperture ring is still set to f22 (marked in red), the camera will not take pictures on any other setting.
- Mark the focus position on the ring and use tape to secure both the aperture and focus rings.
WARNING!
Large adjustments will damage the lens or LC shutter. Make minor adjustments and keep track of initial position.
Some of the Samyangs have had the limiting screws removed to accommodate for the LC shutter in focusing. Turning to far in one direction will result in the destruction of the LC,
in the other direction the lens will fall apart and become very difficult to reassemble.

